Case Study Toolkit
Using Resimion to run a competitive, assessed or for-fun case study in a lecture or offline during a learner’s own time is easy. This toolkit gives an overview of how to create a basic case study.
Case studies differ from quizzes in Resimion in two ways:
- the task/stage functionality isn’t used, instead relying on an initial problem (the Scenario Overview), a set of decisions (often renamed to tests, investigations or procedures) and an output (often named a Hypothesis or Diagnosis).
- learners undertake a number of decisions to reach an output/outcome as a two-part method
Preparation
Before you get started, make sure you have the following available:
- A description of the case, including the expectation of what the learner will do – usually 3-4 sentences. For example ‘a patient presented to A&E with blood coming from the ear. What tests do you run and what diagnosis do you reach?’
- Decisions – both right and wrong – and the possible flow. For example, this might be a range of blood tests or other tests that have to be run in order, or may include tests which give nothing to the learner in terms of progress.
- Outcomes – both correct and incorrect, which will generally be a patient diagnosis or an outcome to a case or conclusion to an investigation
- Scoring – do you want to reward the learner with points? Should the learner be restricted by time during the scenario?
Creating the Case Study
In Resimion, click ‘Create New Scenario’:

Select the Setup tab, and then select a template in Step 1. Usually either the Investigation or Medical templates are most appropriate, and the language can be customised later. Both of these templates use the 2-step method – where you
Scenario overview
Before the learner starts the scenario, you have the option to provide video. This is great for a mini teach or case study introduction, for example. To set up the rest of the overview, see here.
During Step 2, provide a name and description for the case study as detailed during the preparation above.
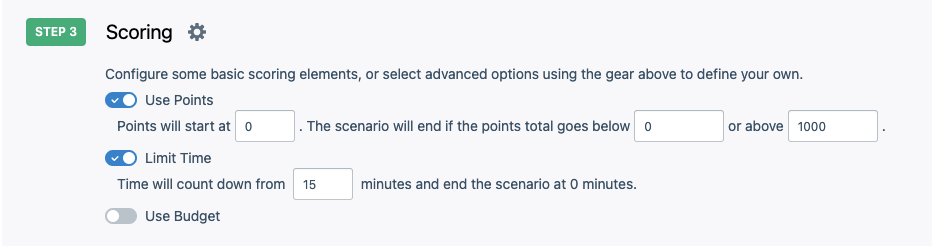
Configure Scoring
You can make scoring as simple or complex as you like. We provide 3 scoring components by default, Points, Budget and Time. Budgets is disabled but easily switched on. For your first case study, leave this alone – and optionally change the time to 5 minutes, for example.
To add more complex scoring capabilities, see scoring.
Adding decisions and outcomes
Firstly consider changing the language of the template if needed. Click the pencil icon by the title to change the language used (for example, change procedures to actions or decisions).

Secondly, add your 2-part content – adding decisions on the left, and outcomes on the right. See adding content for a description of each for more detail.

To make your case study more interesting, add:
- Impacts – give points for right and wrong choices. Either add them quickly with the drop down or click the edit icon to add complex impacts.
- Feedback – add instant feedback (at the time) and after-scenario feedback to give the learner information about how they are performing, or hints
- Use media instead of text – pictures and videos can be used as ‘results’ or ‘facts’ when making a decision – consider using them for a better experience!
- Conditions – decisions and outcomes can rely on other decisions and outcomes, and you can also limit availability based on the scoring component values. (A good example is if you need to do something time dependent – perhaps some decisions can only be taken within the first few minutes, or when you have between X and Y points, for example).
Optional Features
Under optional features, you should set Access Control options appropriately and remove anonymous access if you want to track which users are logging in and using your scenario. See optional features for more information on all optional features.
Test it out!
Save everything and then click the ‘Activate’ button. As this is your first run of this scenario, it will then proceed to generate a 6-digit code which you can give to others.
Visit https://go.resimion.com and enter the code to test it!
Need to do more? No problem: click the Reset button on the scenario and you can edit it further.