Scoring & Rewards
This article explains how to setup scoring, including advanced scoring, and also how to setup impacts for decisions and outputs, actions and conclusions, and also how to use conditions within Resimion to limit availability based on current values.
Scoring Overview
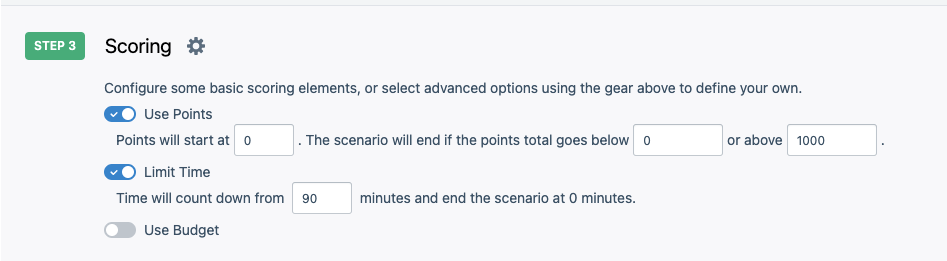
Every scenario contains a single set of ‘metrics’ – items that you define for scoring. By default we automatically add 2 metrics -Time Remaining and Points, but you can switch these on or off. We also make it super easy to add Budget where you want learners to think about a financial impact, for example. You can switch these 3 on or off in the basic settings for Step 3:
The reality, however, is that you can add any metric you like – and it can be controlled automatically (for example time ticking down or up) or manually (for example adding points when an action is selected). Metrics can control what can be selected, as well as terminate the scenario (for example running out of time might end the scenario).
In our example for this article, we are going to setup a new metric called ‘Trainee CSI Reputation’, to give a fun aspect to one of our scenarios. Reputation will start at 50, and tick down every second until it reaches zero. If the learner makes a decision that we think is really ‘cool’, we are going to give the learner an extra 10 reputation points. All the while we are going to leave time remaining and points active in our scenario, this is just a fun additional scoring element/metric!
Accessing Advanced Scoring
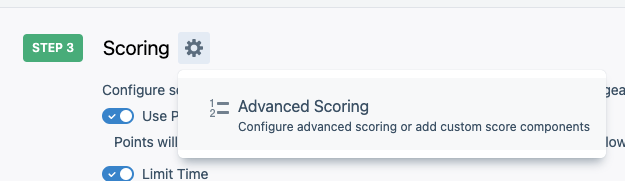
To access advanced scoring, click the Settings cog under step 3, and click ‘Advanced Scoring’.
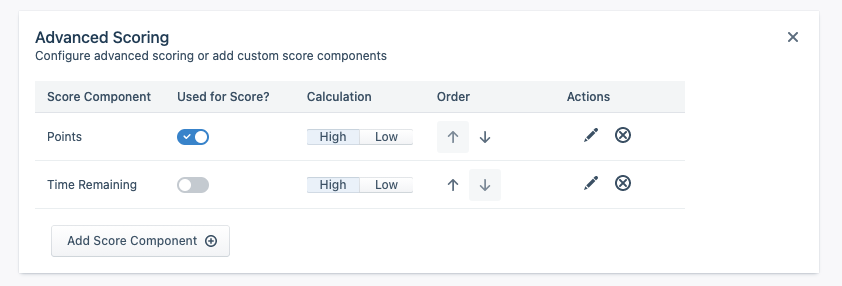
You can add a new Score Component (metric) by clicking ‘Add Score Component’.
Types of Metric
When setting up a new score component, there are a number of different types of metric you can select:
- Integer: these are whole numbers (no decimal part). Great for points, reputation or similar.
- Money: Shows the value formatted with a GBP (£) sign. Perfect for expenditure or budgets. Note: We will add other currencies if you contact us.
- Percentage: Shows the value as a percentage. Great for risk, or remaining life, energy charge, or similar.
- Decimal: Allows partial numbers – for example 1.5, 6.22.
- Time: shows values as time. Internally they are stored as seconds, but displayed as time values.
Behaviour
You can also control how the scenario behaves when this scoring component/metric runs below the minimum or over the maximum:
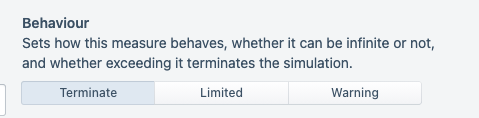
- Terminate: Ends the scenario immediately when the metric is out-of-acceptable range. Will display to the learner why the scenario ended (for example ‘you ran out of time remaining’ or ‘you exceeded maximum points’.
- Limited: Prevents decisions being made that will further exceed the scoring component, but will allow decisions to be made that brings the scoring component back-in-line with acceptable values within the minimum and maximum. For example, if you run out of battery in your torch, you hit 0%, then recharging the torch might bring the metric back-in-range.
- Warning: Warns the user the scoring component is exceeded, makes it red, but otherwise has no effect.
Automated Control
This allows you to control how the measure changes over time. Does it automatically increase or decrease, and by how much every second? If not, then you can leave control set to manual.
Adding a component
When you add a new component, it becomes available throughout the scenario and displays to the user. Ensure you pick a short display name for the component, but also offer a description (which is shown when hovering over the metric).
Every component also has a Minimum, Maximum and Initial Value. The initial value must lie between Min and Max, and Minimum should be less than Maximum.
Be careful how you configure this: if, for example, you configure time to decrease and your initial value is 0, and minimum value is 0, then the scenario will immediately terminate within 1 second if you have selected the ‘Terminate’ behaviour.
If you want the values of this scoring component to show in search, then enable ‘Show this measure in search impacts’. Note however that by doing so, learners can see the impact a decision has BEFORE making the decision!
If you wish to use this score component as part of the ranking calculation, enable ‘Include in scoring’. This will also show this component to the learner when the scenario ends.
Setting Impacts
Every decision within Resimion can have an impact – that is, it can optionally positively or negatively affect one or more of the scoring components. You can even automatically increase or decrease the time remaining based on a decision made.
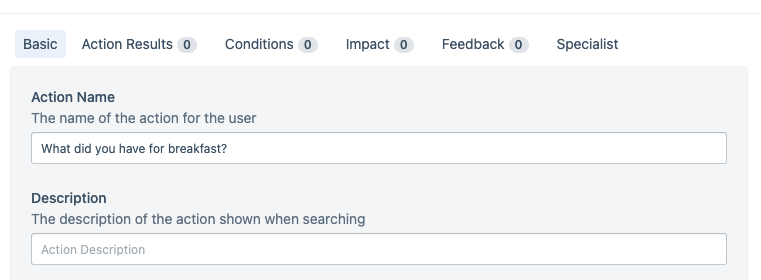
Let’s take an example, using our trainee reputation metric. It would be extremely uncool to ask the FOA what they had for breakfast… and you’d probably shed reputation points for doing so. Firstly, we add our question to the scenario, and then click the ‘Impact’ tab:
Add the ‘Trainee Reputation’ component by clicking the add icon, and then specify a value – in our case -5.
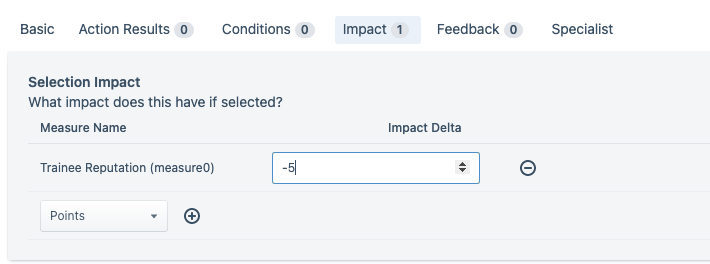
Whenever this question is asked, the trainee now has 5 less reputation points! You can add similar decision impacts for other decisions, add and remove time, or completely terminate the scenario (by specifying a time change of greater than the total range, for example).
Restricting decisions based on score
You can also restrict decisions made based on score components. Click ‘Conditions’ on the decision/question/action and add the item under Restrict Item.
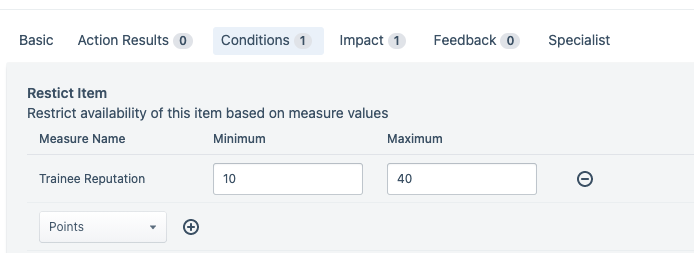
This decision will ONLY be available if Trainee Reputation is between 10 and 40 in our example. Outside of this, the decision will not show in search and will not be available for selection. You can add as many restrictions as you like.