Creating a path
Whether you have designed a quiz, scenario or other problem-based solution in Resimion, every design needs a path from start to finish. That can be a very simple path – for a 5 question quiz, each question may follow another without any conditions – or a more complex path involved in a full crime scene with sub-stages each having an indepdenent path.
In this article, we aim to explain:
- Path types – understanding the difference between stages and decision paths
- Simple and Complex flows – should learners follow one task after another, without being able to return, or should they be able to go back, dive in and out of sub-tasks and similar?
- How tasks/stages progress – should learners have to click a button to move forward to the next task, or should it be automatic when a condition is met?
- Stage/task conditions – the logic you specify that controls whether a stage is available or not to the learner
- Activators – the buttons that allow the learner to activate the next stage.
Understand Paths
There are two types of path to consider:
- Stage/Task Paths – this controls the overall flow of the scenario, and the stages or tasks that the learner will be working on as they run through the scenario
- Decision Paths – which control the decisions and outcomes that the learner can make within each stage or task. Each stage has it’s own set of decisions and outcomes, and therefore it’s own decision path.
In this article we are focusing on Stage/Task paths, and how you can control conditional logic and progression.
Understanding Flows: Simple or Complex?
Before you get started with your scenario, you need to decide on the overall flow, and if this is a simple or complex scenario.
- A simple scenario will not use conditional logic to control the flow of the scenario at the stage or task level, and the learner can control moving forward from one stage/task to another stage/task. if the learner makes a decision earlier in the scenario, it will not affect the overall flow of the scenario later.
- A complex scenario, on the other hand, will involve decisions made earlier in the scenario changing the outcome either slightly or significantly, or even control the overall flow.
Let’s take a few examples:
- Simple flows: Multiple choice questions, basic lab processes, patient diagnosis, health and safety
- Complex flows: Crime scenes, adventure trails, police investigations, hostage negotiations
Controlling Path Progression
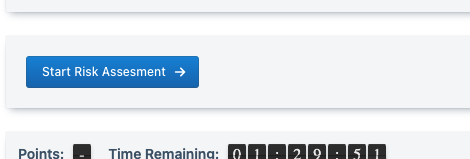
Stages/Tasks can progress either automatically or manually. You might wish to give your learners the ability to ‘go back to an earlier part’ of a scenario or choose a number of different routes through the scenario as they like. For example, in a Crime Scene scenario, most stages/tasks might progress manually. the learner will do something – for example ask FOA questions – and the learner decides the point at which they have asked enough and wishes to move onto a risk assessment.
For a multiple-choice quiz, however, the learner might select an answer and move to the next question or task automatically.At any given point in time in a scenario, the system has a list of ‘available stages‘ – those stages which the user could move to if they have the option to do so. The list of available scenarios is based on ‘conditions’ – for example, you can only get to Task 2 if you have performed Task 1 first. Or, you can only get to Task 3 and Task 4 if you have reached 500 points and have less than 5 minutes remaining. For each stage/task you can also control whether a learner can return to that stage/task later in the scenario.
Example: Linear Path
In a linear path, the student moves from one task to the next, and is unable to return to the last task at any point. They can only move to the next task when the previous task has completed.
To set up stages in this manner, you should do the following:
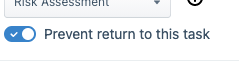
- For each task, edit the task, select ‘conditions’ and switch on ‘Prevent return to this task’
- Secondly, you should add the previous task as a requirement. Assuming we are doing Scene Observations and we wanted Risk Assessment to be completed first, we add ‘Risk Assessment’ as a required task under ‘All of’:
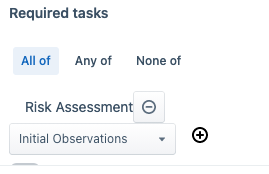
If this is done for all tasks, with only the first not having a requirement, then the flow will be entirely linear.
Activators: How do I provide buttons to move between tasks?
Each task is ‘activated’ by a button when the task is in manual progression mode (that is, unless it is the initial task). Resimion will show a list of activators to the learner based on which tasks they can transition to – which is controlled by your conditions. Activators show in the activator area.
If you had no conditions attached to each task then all activators would show (and the learner can navigate backwards and forwards as they like):

If you wanted linear progression and you setup conditions as above, then only the next task would show: